
In Canada, any outdoor renovation related to your home can be a tricky matter, and as a homeowner, you might be concerned about whether installing such an awning requires a building permit. The following brief explanation should help you:
💡 Residential Awnings
Planning regulations typically state that if you are not creating usable space, such as attaching it to an existing building to provide shade for an already constructed deck or patio, you do not need to apply for a permit. However, if the awning’s projection is substantial, extending into your neighbor’s property boundary or potentially causing property damage by directing rainwater into your neighbor’s property, further consideration and design optimization may be necessary.
💡 Commercial Awnings
Commercial property owners generally need to obtain permits to install awnings. Buildings along busy commercial streets, like shops or cafes, may have awnings that extend over the sidewalk. Different cities may have varying regulations concerning public health and safety.
If an existing awning needs replacement due to aging or damage, you only need to replace it with something similar, without the need for a new permit. However, many commercial property awnings carry branding and signage, which may be subject to advertising regulations set by relevant authorities.
💡 Awnings for Apartments and Townhouses
For owners of apartments or townhouses attached to other units, approval from the board is required to install awnings. This is because awnings can affect the overall appearance of the apartment complex and may involve maintenance costs shared by all unit owners. Some property management companies might allow you to install awnings at your expense, provided they do not alter the building’s exterior. Before considering any addition or alteration to awnings in Ontario, homeowners should refer to the Condominium Act of Ontario. You should write to the board, detailing the dimensions, color, and materials of the awning you are considering, along with photos, the name of your insurance company, and the installation company’s name.
When our customers inquire about the lifespan of awnings at the time of purchase and how long they can expect these awnings to last once installed, it’s important to note that providing a precise answer can be a bit challenging. Awnings’ longevity is influenced by a variety of factors, but generally, you can anticipate a lifespan of around ten years.
Let’s break down the key factors affecting the lifespan of awnings:
💡 Quality of Materials:
The type of material used in the awning has a significant impact on its durability. High-quality materials like canvas and polyester are known for their ability to withstand the elements, offering resilience against sunlight, rain, and other external factors.
💡 Installation Method:
Proper installation is crucial in minimizing the effects of weather conditions, such as wind and rain, and, as a result, extends the awning’s lifespan. Ensuring sturdy supports and using correct fastening techniques is essential.
💡 Environmental Conditions:
Awnings are exposed to different weather conditions, including intense sunlight, rain, and storms. Severe environmental conditions can lead to quicker wear and tear.
💡 Frequency of Use:
The more frequently you use your awning, the shorter its overall lifespan may be. If you’re using it throughout the year as opposed to only during specific seasons, it could affect how long it lasts.
💡 Maintenance:
Regular cleaning, applying waterproofing treatments, and properly storing the awning when not in use can significantly extend its lifespan. Avoiding retracting a wet awning and performing regular checks on the stability of supports and connections are important maintenance practices.
It’s important to understand that the intensity of sunlight and other environmental factors can vary from place to place, making it challenging to provide a one-size-fits-all answer regarding the awning’s lifespan. Continuous year-round usage might slightly reduce the awning’s lifespan, but the majority of our customers tend to use their awnings during specific seasons. By using your awning correctly, investing in a high-quality product, and ensuring it receives proper maintenance, even year-round use can offer a lifespan of approximately 5 to 7 years.
Many times, concerns about the awning’s lifespan revolve around the product’s quality and whether the retailer has provided the best possible quality. However, it’s worth noting that, in addition to the product’s quality, your usage and maintenance practices play a crucial role in determining your awning’s lifespan. Incorrect practices, such as retracting a wet awning after rain or neglecting prompt cleaning, can lead to significant wear and tear. Even a high-quality awning may not have a long lifespan without correct usage and care.
- Top-down Bottom-up Shades
- Pleated Shades
Aluminum/Mini Blinds will be available but temporarily only in a static height that can not be raised and lowered. They will feature a tilt rod that will allow you to tilt the slats open and closed for adjustments to your view and privacy.

In the diagram provided, you’ll see a series of large numbers marked 1, 2, 3, and 4, which correspond to whole inches. So, 1 = 1 inch, 2 = 2 inches, and so on. Between these numbers, you’ll find shorter marks representing fractions of an inch. The mark in the middle of an inch denotes 1/2 inch, while the marks on either side represent 1/4 and 3/4 inch, respectively. Smaller marks denote 1/8 and 1/16 inch (highlighted in red).
For example, a 16-foot tape measure will have sixteen one-foot marks and 192 one-inch marks (12 inches per foot). Each inch is then divided into eight 1/8-inch marks and sixteen 1/16-inch marks.
General Tips:
- The hook or ‘tang’ at the end of the tape measure’s blade is typically made of metal and may appear to move slightly. This is normal and allows it to provide accurate measurements when pressed against an object (for internal measurements) or hooked around an object (for external measurements).
- Some pocket tape measures have a known case length (e.g., 7cm), while others compensate for case length on the blade or use a viewing window. Most tapes require users to account for the case length themselves, especially when taking internal measurements.
Safety Tips:
- When rewinding the tape measure, never allow the blade and hook to return uncontrolled at full speed, as this can be dangerous. Safety glasses or goggles are recommended when using a tape measure.
- Some tape measures may have steel blades with relatively sharp edges, so use caution to avoid injury, especially when retracting the tape quickly.
Please place orders through the official company email at service@shadingmaster.com or collect information from our authorized sales representatives. All orders should include the following details:
- Selection of the product series, type, and color.
- Color name and color code (refer to the color chart).
- Choice of control system: manual or motorized (motor type).
- Position of the control cord: left pull, right pull, or dual-side pull.
- Accurate measurements of the window, including width and height (within a 3mm margin of error).
- Distance from the window sill to the ground.
- Installation type: external or internal; ceiling-mounted or side-mounted (side-mounting refers to using side-mounted brackets at both ends).
- Any additional customization requirements.
Please ensure that all necessary information is provided for a formal order.
At Shading Master, we offer a diverse range of products, each with its unique measuring requirements. Fortunately, we’ve simplified the process of correctly measuring your windows for blinds and shades. Our instructions are thoughtfully divided into easy-to-follow steps, ensuring precise measurements for any type of shade or blind in our collection. Save time, money, and your peace of mind by getting it right on your first try with these measuring guidelines.
Here are some essential tips and reminders:
- Use a steel measuring tape. Do not use a fabric tape measure.
- Round your measurements to the nearest 1/8″ (approximately 3.2 millimeters) for width. For instance, if you measure a width of 33 15/16″, consider it as 33 7/8″.
- Also, round your measurements to the nearest 1/8″ for height.
- When using a metric scale for measuring windows to customize roller blinds, the margin of error is typically within 3 mm.
- Clearly record the measurement values – width and height.
Keep in mind that for inside mount installations, you should provide measurements as indicated above. Our factory will handle the necessary deductions on each side to ensure your blind operates smoothly, so there’s no need to account for these deductions in your measurements.
Depth Requirements
- You first have to make sure your window has enough mounting depth for an inside mount.
Measuring the width
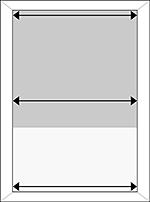
- Measure the exact width (left to right) of the inside top edge of the window frame.
- Write down that size making sure that it is the first number of the measurement. This is the width you will order.
- Deductions that will be made by our factory.
Measuring the height
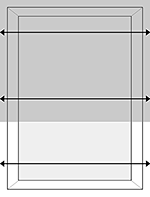
- Measure the exact height (top to bottom) from the top inside edge down to the window sill in three places.
- Take the largest of the three measurements.
- Write down that size making sure that it is the second number of the measurement. This is the height you will order.
- Roller shades will come with extra fabric to conceal the roller.
NOTE: Width and length measurements may vary +/- 1/8
Flat surface requirements
- First decide where you want to mount the shade outside of the window frame. Make sure you have a minimum of 2 ½” of flat space. To find the product’s specific mounting requirements, refer to the information in the “Product Info” tab on whatever product you’re ordering.
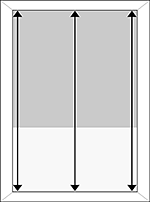
Measuring the width
- Measure the exact width (left to right) of the wooden or metal window frame or how wide you would like the blind or shade to be.
- Use that measurement and add at minimum of four inches, which is 2” for each side. This will ensure the window is properly covered.
- Write down that size making sure that it is the first number of the measurement. This is the width you will order.
- Deductions that will be made by our factory:
Measuring the height
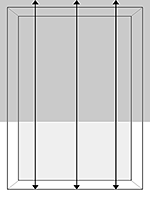
- When measuring the window’s height, take it from three locations: the top, middle, and the bottom.
- You’ll use the largest of the three measurements and add a minimum of four inches, which is two for the top and two for the bottom. This ensures the window will be properly covered.
- Now you have the perfect height and you’re ready to order.
- Roller shades will come with extra fabric to conceal the roller.
NOTE: Width and length measurements may vary +/- 1/8
Dust removal
In most cases, just use a feather duster to gently dust off regularly.

Vacuum
Use a low-suction hand-held vacuum cleaner to remove dust more thoroughly.

Hair dryer
Use a hair dryer to turn on the cold air to blow away the dirt and debris between the blades.

Cleaning methods for different product categories may vary. Here are cleaning suggestions for some common products:
Fabric Venetian Blinds: If the surface of the blades has only a thin layer of dust, you can use a feather duster to sweep away the dust. If the blades have deeper stains or oil spots, you can mix a mild detergent with water, spray it on the curtain blades, scrub with a soft brush, and finally rinse with clean water. Air dry naturally.
Shangri-La Shades: Gently vacuum with a vacuum cleaner equipped with a brush head, or use a hairdryer (without heating) to blow away the dust on the curtains.
Dream Shades: Gently vacuum with a vacuum cleaner equipped with a brush head, or use a hairdryer (without heating) to blow away the dust on the curtains.
Hanas Shades: Gently vacuum with a vacuum cleaner equipped with a brush head, or use a hairdryer (without heating) to blow away the dust on the curtains.
Roller Shades: Use a feather duster or a soft brush to gently sweep away the dust on the curtains.
Honeycomb Shades: Use a feather duster or a soft brush to gently sweep away the dust on the curtains.
Zebra Shades: Use a feather duster or a soft brush to gently sweep away the dust on the curtains.
Roman Shades: Use a feather duster or a soft brush to gently sweep away the dust on the curtains.
If changes are needed due to customer errors, such as incorrect measurements or model misidentification from customer, the customer is responsible for the associated costs.
For products requiring modifications without reproduction, we will assess reconfiguration charges based on specific circumstances. Please refer to the reconfiguration price list for details.
Transportation costs and any additional expenses related to the reconfiguration process will be the customer’s responsibility.
On standard venetian blinds, the inner “ladder” cords can create a loop larger than 44cm when a minimal amount of force is applied, making them non-compliant. Many venetian blinds are now tilt-only meaning that the blind does not raise up in the window. There are some blinds available that are fixed to the window sill so that the inner ladder cords cannot become slack and cause strangulation. The blinds can be manually un-clipped from the sill and then will raise up complete in order to access the window, however they cannot be left in a partially raised position.